![Sportal365 logo-4.png]](https://knowledge-base.sportal365.com/hs-fs/hubfs/Sportal365%20logo-4.png?height=40&name=Sportal365%20logo-4.png)
Social publishing lets your newsroom post to social networks from the CMS. Posts go out through your own PostFast workspace to X (shown as x.com in the CMS), Facebook, Instagram and LinkedIn. PostFast supports more networks than these, but the CMS posts only to these four and ignores the accounts of any other network in the workspace.
There are two ways to start a post. From an article, video, gallery or wiki page, the Post to social button prepares a post from the content for you. In Social publishing itself, New post starts a post from scratch. Either way, the same page lets you review, approve, schedule and track every post. This guide follows that routine.
Before you begin
- The PostFast subscription is yours: you buy it from PostFast, connect your social accounts there and create the API key that connects the CMS to your workspace. The steps are in the PostFast Integration Process guide.
- The Post to social button comes with the integration. If it is missing from your edit screens, ask Sportal365 support to check that Social publishing is switched on for your project.
- Direct posting is a setting of your project. When it is on, Admins and Editors see Post to social as the main button of the dialog and the post goes out without review. When it is off, everyone sees Send for review instead, and an Admin or an Editor approves the post on the Posts tab. This guide says where the two differ. If the dialog does not behave the way you want, ask Sportal365 support.
- Social publishing is in the left sidebar, in the Integrations section. If PostFast is not connected yet, the page shows a red PostFast is not available message above the tabs instead of your posts.
Who can do what
What you can do depends on your CMS role:
- Admin and Editor post directly (when direct posting is on for the project), approve and schedule posts, reject or cancel them, retry failed ones and change the Settings.
- Journalist writes posts and saves drafts, and sends posts for approval. An Admin or an Editor approves them before they go out. A journalist cannot change a post that is already approved.
- Reader can look at Social publishing but cannot write posts.
If you try something your role does not allow, a red message You cannot do this explains why. A journalist who opens Post to social sees Your post goes for review, and the main button reads Send for review. When direct posting is off for the project, the main button reads Send for review for every role, and an Admin or an Editor approves the post in Posts.
Post an article, video, gallery or wiki page
The quickest way to share content is the Post to social button on the edit screen of an article, a video, a gallery or a wiki page. It prepares the post from the content and only needs your check. The content must be published first: the post carries a link to it, and the link works only when the content is live.
- Open the saved content for editing. Make sure everything is saved: the post is made from the last saved version, never from edits you have not saved yet. The Post to social button sits next to Notify users at the top of the screen.

- Select Post to social. The dialog opens with the post already prepared from the content.
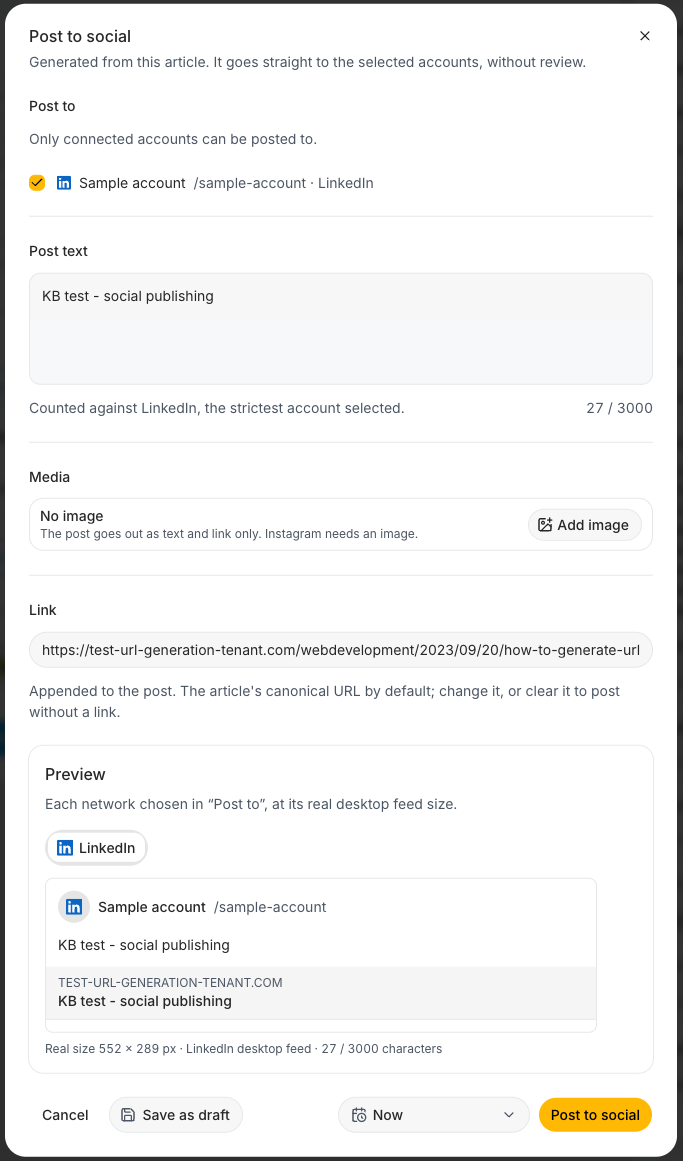
- Under Post to, check the accounts. With direct posting on, every connected account is ticked for you (Instagram only when the content has an image); with it off, only the first connected x.com, Facebook and Instagram account are. Untick the ones you do not want. An account that is disconnected shows a red Disconnected badge and cannot be ticked.
- Read the Post text. It is filled in with the title of the content (with its subtitle, when it has one). Edit it as you like. The counter shows how many characters you have used and which network sets the limit.
- Check the Media row. The content’s main image is added when it has one. Select Add image to choose another from the CMS Media Library, or Remove to post without an image. Instagram needs an image: without one, a message says so and you must untick Instagram first.
- Check the Link. It is the address of the content, and it is added at the end of the post. Change it, or clear it to post without a link.
- Look at the Preview. It shows the post for each network you ticked, at the size it has in that network’s desktop feed. Use its tabs to switch between networks.
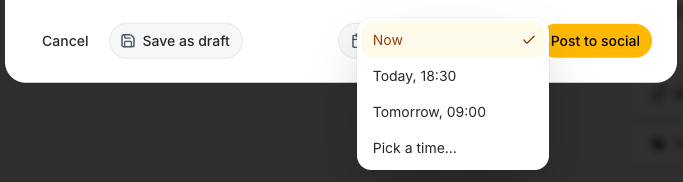
- Open the time selector in the footer. Now posts it within a minute (it is there only when direct posting is on; otherwise the next free time is the default). Otherwise choose one of the next free times, or select Pick a time… to choose a day and one of its open times.
- Select Post to social (or Send for review if you are a journalist, or when direct posting is off). The dialog closes and a message confirms where and when the post goes out. Follow it in Social publishing, on the Posts tab.
If you are not ready, select Save as draft instead. The post is saved as a draft in Social publishing and nothing goes out.
With direct posting on, the main button stays dimmed while the content is not published, with a warning This article is not published yet (or video, gallery or wiki page). Publish the content first, or use Save as draft. It is also dimmed when no account is ticked, when Instagram is ticked without an image, and when a network has no daily allowance left. With direct posting off, an unpublished content or a used-up allowance only shows a warning, and the post waits for review.
Follow your posts in Social publishing
Select Social publishing in the left sidebar. The page has four tabs: Posts, Accounts, Analytics and Settings. The Posts tab lists every post: the ones from the Post to social button and the ones you write in New post.
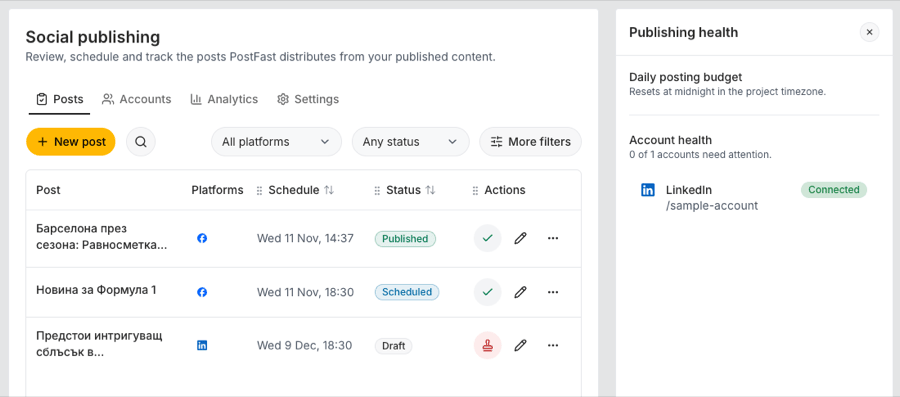
Each row shows the text of the post, the content it came from (when it came from content), the networks it goes to, when it is scheduled and its status. Select the Schedule or Status header to sort by it. Twenty posts are shown per page.
Search and filter the posts
Narrow the list with the toolbar above the table:
- The search box finds posts by their text or by the title of the content they came from.
- All platforms keeps one network: x.com, Facebook, Instagram or LinkedIn.
- Any status keeps one status: Needs review, Draft, Scheduled, Published or Failed.
- More filters opens three more: Account, Category (the main category of the content) and Published (Today, Last 7 days or Last 30 days).
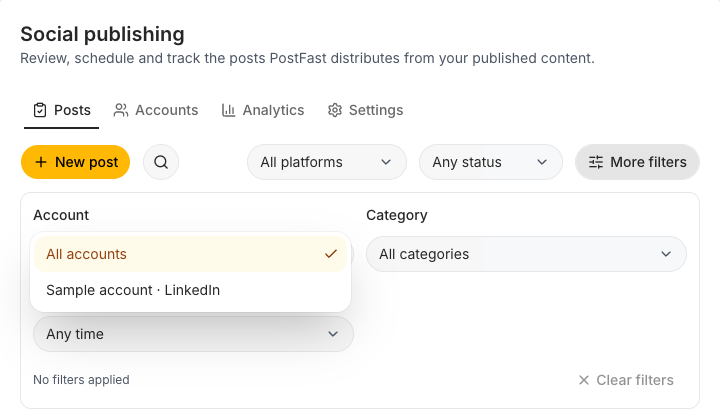
The panel counts the filters you applied. Select Clear filters to remove them; the search text stays.
What each status means
- Needs review: the post is written and waits for an Admin or an Editor to approve it. This is where a journalist’s posts wait. Nothing has been sent yet.
- Draft: saved but not submitted. Nothing has been sent.
- Scheduled: approved and queued in PostFast for the time shown.
- Published: PostFast has sent it.
- Failed: PostFast could not publish it. Point at the red status to read the reason.
Approve, edit, reschedule, reject or cancel a post
The buttons at the end of each row depend on the status of the post and on your role:
- The red stamp (Needs approval, click to approve now) on a Needs review or Draft post approves it and schedules it at its own time (Admin and Editor). If that time has already passed, or the post has no time yet, you are asked to open it and choose one first. Once a post is approved, the stamp becomes a grey tick.
- Edit opens the post in the editor. Selecting the text of the post does the same.
- More actions opens a menu with Open source content (opens the content the post came from in a new tab), Reschedule, Reject (for Needs review and Draft posts) and Cancel post (for Scheduled posts).
- On a Failed post, select the red Failed status to try again (Admin and Editor).
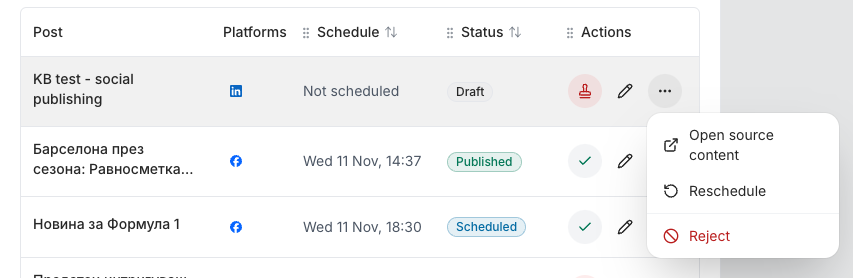
Reject asks Reject this post? and you confirm with Reject post: the post is removed and never sent, and this cannot be undone. Cancel post asks Cancel this post? and you confirm with Cancel post or leave it with Keep it scheduled.
Edit or reschedule a post
- On the row of the post, select Edit, or open More actions and select Reschedule. Both open the post in the editor, where you can change the accounts, text, image, link and time.
- Choose the time in the selector next to the main button (see Choose when to publish), then select Approve and schedule. Journalists select Send for review. Save as draft keeps your changes without approving.
A post that is already Published cannot be changed on the network. Editing it creates a new post, and the main button reads Publish again: what already went out stays where it is. A Scheduled or Failed post is read-only for a journalist, with the message This post is already approved.
Write a new post
Use New post for a post that does not come from a piece of content, or when you want to prepare one without opening an article. A new post starts blank: no account is ticked and there is no image.
- On the Posts tab, select New post. The editor New social post opens.
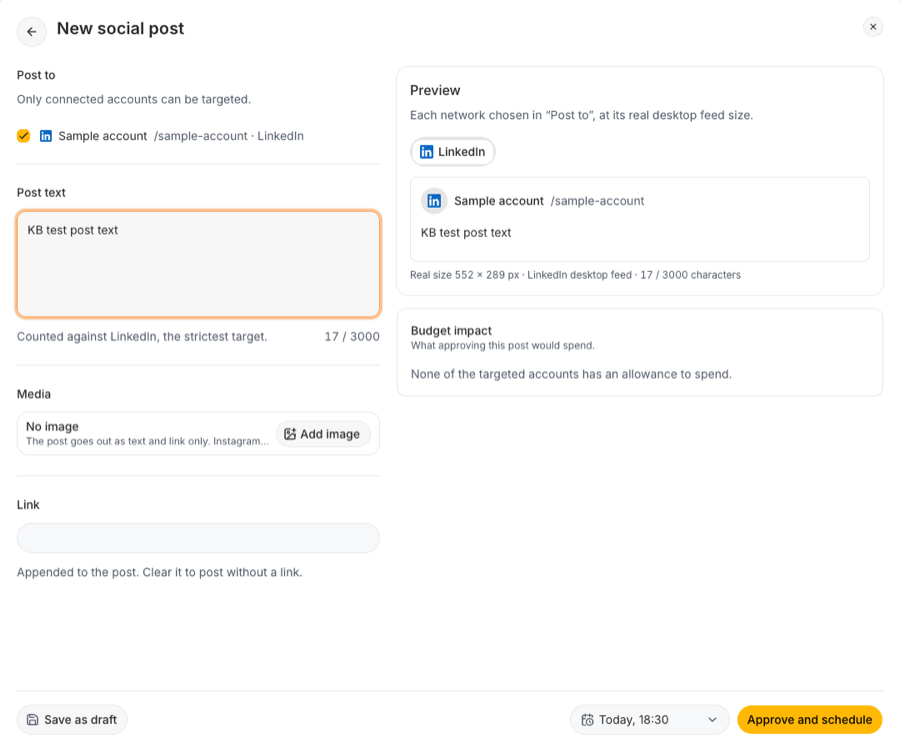
- Under Post to, tick the accounts. Only connected accounts can be chosen.
- Type the Post text. The counter shows used / limit and a note such as Counted against LinkedIn, the strictest target: the limit is the lowest one among the networks you ticked. The limits shown are 280 characters for x.com, 63,206 for Facebook, 2,200 for Instagram and 3,000 for LinkedIn. Going over turns the counter and the text in the preview red, but does not stop you from saving, so check it yourself. PostFast and the networks apply their own rules.
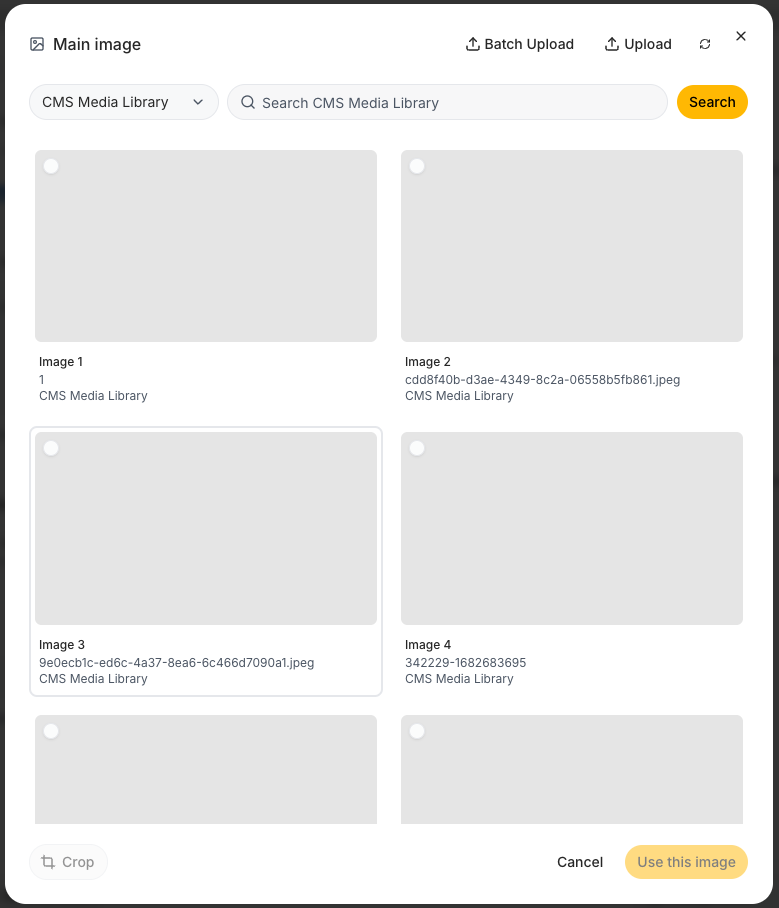
- Under Media, select Add image. In the Main image dialog, type a search and select Search, pick an image from the CMS Media Library and select Use this image. Crop lets you add a crop of the image. Images come only from the CMS Media Library: Batch Upload, Upload and Regenerate in this dialog are not available yet, so upload the image to the Media Library first. Without an image the post goes out as text and link only, and Instagram cannot be used.
- Once there is an image and a network is ticked, Image format lets you choose, for each network, which crop of the image it uses. Only crops that the network shows without cutting are listed, and the recommended one is marked.
- Fill in the Link if the post should carry one. It is added at the end of the post. Leave it empty to post without a link.
- Set the options of the networks you ticked. For Facebook, Publish as offers Feed post, Reel and Story, and Show the link as a preview card is on by default. For Instagram, Publish as works the same way. For x.com and Instagram, Attach the link as a first comment puts the link in the first comment instead of in the post. LinkedIn has no options.
- Check the Preview: one tab per network, at the real size of its desktop feed. Under it, Budget impact shows what approving the post would use of the day’s allowance for each network.
Choose when to publish
The time selector in the footer offers the next free time, Today and Tomorrow times, and Pick a time…. The default is the next free time. The editor has no Now option; Now exists only in the Post to social dialog, and only when direct posting is on.
- Open the time selector and select Pick a time….
- In the calendar, days with a dot have open times. Choose a day, then choose one of its Open times (the day has a few fixed times, not every hour). Times already taken by other posts, or already past, cannot be chosen.
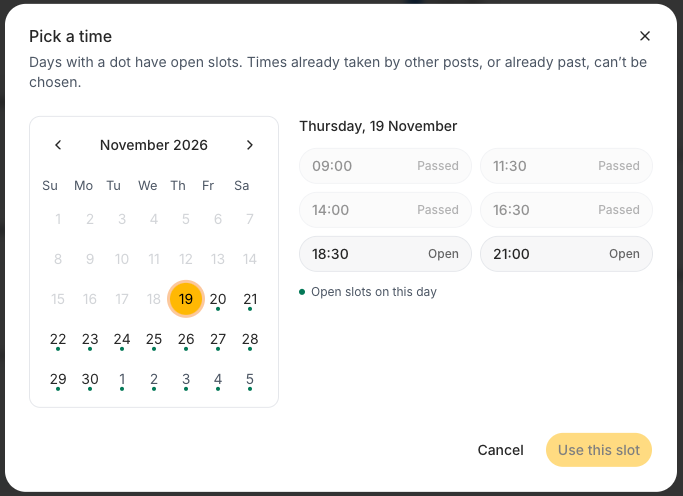
- Select Use this slot. The time now appears in the selector. Select Cancel to close without choosing.
- Select Approve and schedule to approve the post for that time (Admin and Editor), or Send for review (Journalist). Select Save as draft to keep it without approving. The post then appears in the list.
Save as draft and Approve and schedule stay dimmed until at least one account is ticked, and Approve and schedule also stays dimmed when Instagram is ticked and there is no image.
See the connected accounts
The Accounts tab shows one card for each account connected in your PostFast workspace: the network, the account name, a link to its profile that opens in a new tab, the badge Connected (or Disconnected) and the number of followers, or Followers not reported when PostFast gives none. Only X, Facebook, Instagram and LinkedIn accounts are listed.
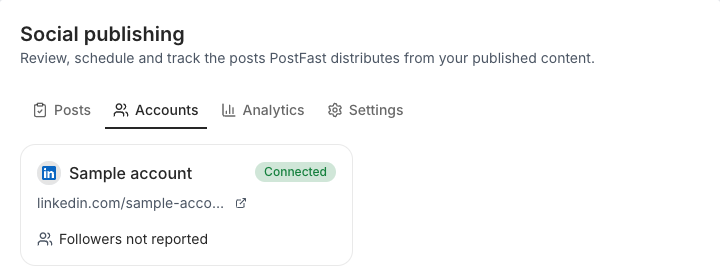
The CMS does not connect, remove or reconnect accounts. That is done in PostFast. When an account needs reconnecting, a red message above the cards says so, and its Reconnect button reminds you to reconnect the account in PostFast. Scheduled posts to a disconnected account keep failing until it is reconnected. To reconnect, open your PostFast workspace, go to Accounts, select Add Social Account and choose the network. The PostFast Integration Process guide covers the rest of the PostFast side.
Follow the results
The Analytics tab shows how published posts did. The date button at the top (Last 7 days by default) opens the range: choose Today, Yesterday, Last 7 days, Last 30 days, This month or Last month, or pick the first and last day in the calendar and select Apply.
- Four cards give the totals for the range: Published, Impressions, Engagements and Engagement rate (engagements divided by impressions). A post sent to three accounts counts as three.
- The table lists each published post with its network, impressions, engagements and reach. A reach of 0 can mean that the network does not report it.
- These are PostFast’s platform metrics, not the view counts of your own site.
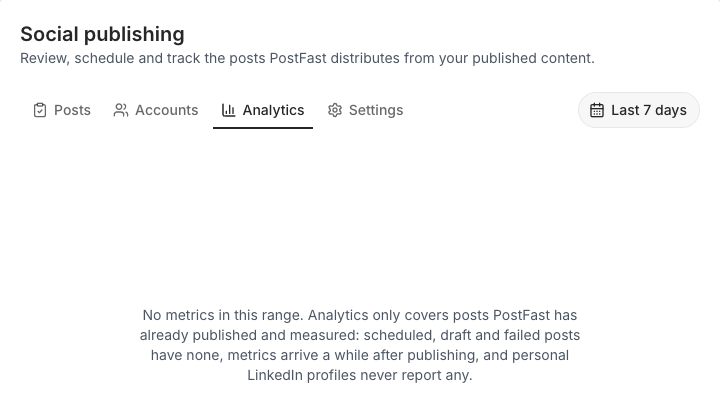
Analytics covers only posts that PostFast has already published and measured. Scheduled, draft and failed posts have none, the numbers arrive a while after publishing, and personal LinkedIn profiles never report any. That is why the tab can say No metrics in this range.
Check the PostFast connection in Settings
The Settings tab shows the state of the connection. Everyone can look at it; only Admins and Editors can change it.
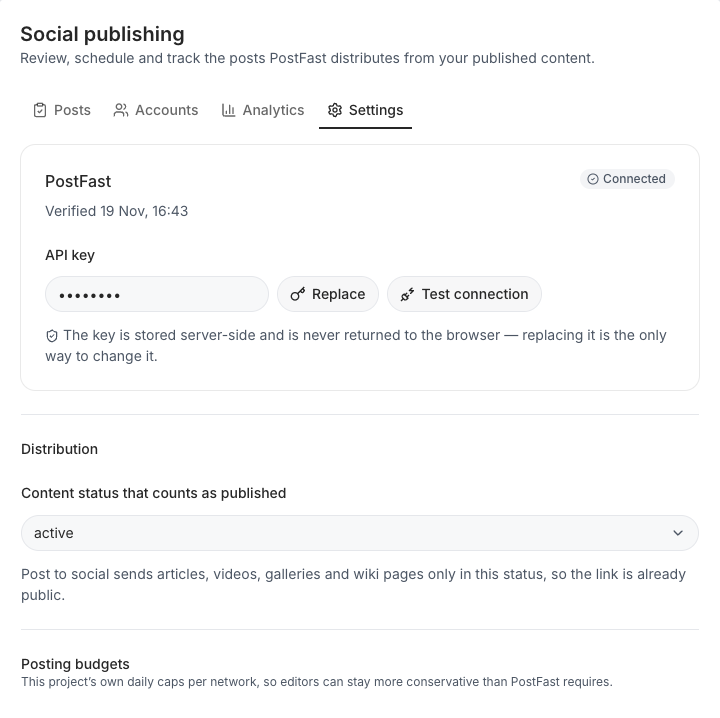
- The PostFast card shows the badge Connected and when the connection was last verified. The API key field shows a masked key: the key is stored on the server and is never shown in full.
- Select Test connection to check the key with PostFast again. A message Connection checked confirms it, and the Verified time updates.
- Select Replace, paste the new key and select Save key to change it; Cancel keeps the old one. The key is checked with PostFast and, once accepted, replaces the old one. Generating a new key in PostFast invalidates the old one at once, so copy the new key immediately and paste it in Replace right away; the CMS cannot post until the new key is saved. The PostFast side is in the PostFast Integration Process guide.
- Content status that counts as published decides which content can be posted: Post to social sends articles, videos, galleries and wiki pages only in this status, so the link is already public. Choosing a status saves it at once.
- Posting budgets shows the daily limit for each network as read-only meters. The limits come from PostFast, so they cannot be changed here.
Watch the daily allowance and account health
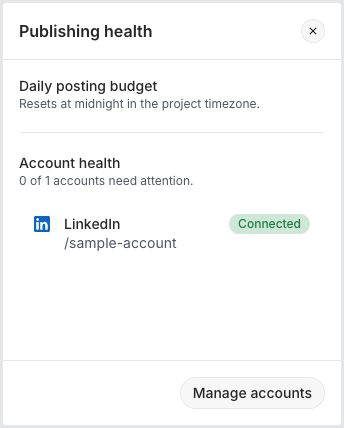
The Publishing health panel sits on the right of every tab. Close it with the cross, and open it again with the Publishing health button.
- Daily posting budget shows, for each network, how much of the day’s allowance is used, shown as used / allowed, for example 3 / 10. The limits come from PostFast. The panel resets at midnight in the project timezone. The bar turns red at the limit.
- Account health counts the accounts that need attention, with a green Connected or a red Needs reconnect badge for each.
PostFast sets these limits and describes them in its Fair Usage Policy, which can change and counts its day by its own clock (midnight UTC). The editor and the Post to social dialog use the same numbers: Budget impact warns when approving a post would go past a limit, and, with direct posting on, Post to social stays dimmed until the allowance resets.
Good to know
- Posts to other PostFast networks, such as TikTok or Threads, are not made from the CMS, and accounts of those networks are not listed.
- A rejected post leaves the list and cannot be recovered.
- You buy the PostFast subscription, and PostFast sets the platform limits. For help with your PostFast plan or account, contact PostFast.
- The text you see in a preview is the post as the CMS prepares it. Always check the post on the network once it is published.
Troubleshooting
- The Post to social button is missing. It comes with the integration. If it is not on the edit screen of a saved article, video, gallery or wiki page, write to Sportal365 support and ask them to check that Social publishing is switched on for your project. The button also appears only on the edit screen of content you have already saved.
- Social publishing shows “PostFast is not available”. The CMS cannot reach your PostFast workspace. The message gives PostFast’s reason, for example an ended subscription or a key that was rejected. Check your PostFast plan and, in Settings, select Test connection or Replace the API key. If it keeps failing, write to Sportal365 support.
- The main button of the Post to social dialog is dimmed. With direct posting on, check the warning in the dialog. The content may not be published yet, no account may be ticked, Instagram may be ticked without an image, or a network may have no allowance left today. Save as draft stays available. With direct posting off, the button is Send for review and is not dimmed by the first and last of these.
- A post shows Failed. Point at the status to read the reason. An Admin or an Editor can select it to try again. If an account has lost its connection, reconnect it in PostFast first (Accounts, then Add Social Account).
- I see “You cannot do this”. Your CMS role does not allow that action. Journalists can save drafts and send posts for review; Admins and Editors approve and post. Ask an Admin or an Editor.
- I cannot change the API key. Only Admins and Editors can change the Settings. For anything else about the integration, write to Sportal365 support.
- Analytics is empty. Only published posts that PostFast has measured appear, and the numbers come a while after publishing. Personal LinkedIn profiles never report any.